This post was updated on July 8, 2020.
The MeisterTask team has been hard at work (mostly remotely) developing features that aim to make your work more enjoyable and productive. Let’s talk about takeaway coffee for a second. When you buy one, and it comes with a little heart or flower made out of foam, it gives you that warm fuzzy feeling, doesn’t it? It might not be worthy of a parade, but it definitely makes your coffee experience just that much more special. At MeisterTask, we’re firm believers in the difference that little things make. So we’ve released a few new features that aim to improve your productivity and enhance your experience overall. Check them out:
Task Improvements
Reactions to comments
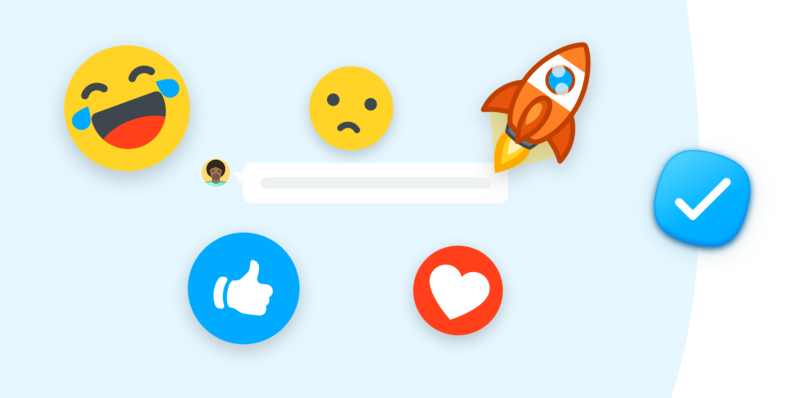
You now have more options when it comes to reacting to comments on tasks. Initially, it was only possible to “like” a comment. But if you’re like me, and secretly wished you had a fancy rocket to react to all those amazing comments you receive (totally true by the way), it just wasn’t possible. Great news! It is now. Choose your appropriate reaction from the five reaction icons now available, and make sure people know when you really love something vs. when you only thumbs up something.

Reactions are available on all MeisterTask plans. To access this feature, simply click on the grey smiley face icon above the comment you wish to react to — et voila!
Reply to comments
Why stop at reactions? We were on a roll! Let me say that this particular feature has helped us A LOT internally here at Meister. Really big tasks often involve quite a bit of input from quite a few people. It’s really easy for key information to be overlooked simply because it’s comment number 30 in a thread of 100 comments or for more recent comments to be taken out of context. With this new update, you are now able to reply to specific comments and the comment that you’re replying to will be quoted in your reply. Neat, right?
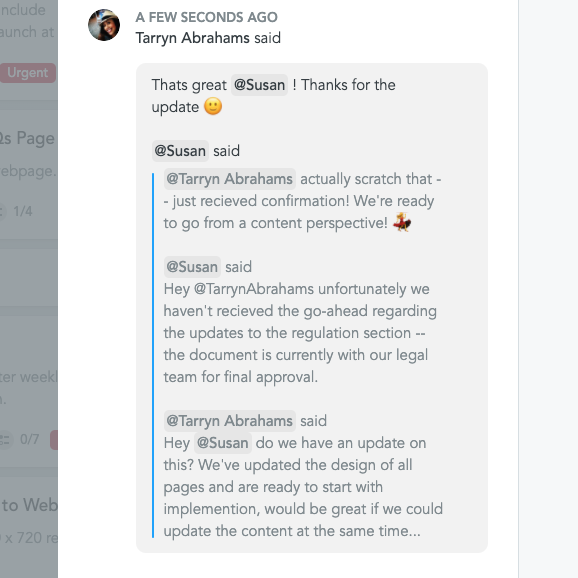
You can reply to comments on all MeisterTask plans. To use this feature, hover your cursor above the comment you’d like to reply to and then click on the gray speech bubble.
Task IDs
Many of our users asked us if we could implement a feature that would automatically create a unique number for every task created. Your wish is our command! Task IDs are now a thing. Every task created on MeisterTask comes ready with a unique ID that never changes!
Task IDs can be used for a number of things, like:
- tracking a task when associating orders to a supplier to a particular task, or when
- documenting all tasks in a spreadsheet, simply replace the task link with the task ID
- and finally, use the task ID as a substitute for copying the task link into a pull request when working with Github or Bitbucket.

We’ve also made it very easy for you to copy your task’s ID — all you need to do is click on the icon to the left (highlighted in blue in the image) and done — paste it wherever you like!
Everyone can make use of Task IDs as they are available on all MeisterTask plans.
Project Improvements
Collapsible sections
MeisterTask offers unlimited sections to suit the most complex of workflows. That being said — we’re still all about giving you a more focused overview. Projects with many sections will benefit the most from this feature — similar to the show/hide functionality available in most spreadsheet software tools, you can now collapse certain sections in your project/s. Have a Backlog section filled with hundreds of tasks that you aren’t ready to work on yet? No problem! Just collapse that section. Out of sight, out of mind. What’s more, customizing this view doesn’t change the project settings or anyone else’s project view. That means that any collapsing you do will only be viewable by you!
To collapse a section in your project, go to the relevant section, open up the settings, click the 3 dots and then select collapse. Alternatively, you can simply double-click on the section’s icon. Expand your section again by hovering your cursor over the section and then clicking on the “expand” arrows.

Collapsible sections are available to users on MeisterTask Pro and Business plans. Upgrade now and get access.
Mention non-project members in projects
At MeisterTask, we aim to make collaboration as easy as possible! So we added yet another way for you to invite colleagues to your project — you can now mention them in comments. It’s as simple as typing in the @-sign followed by their name. You’ll then be prompted to invite them to your project and with a click of the button, you guys can get to work.
Keep in mind that this feature will only work if:
– Your team owns the project (…)
– You’re trying to invite a member of your team

You can still collaborate with externals or people outside your organization using the regular invite dialog.
Show project group members
If your company works with groups, you’ll know how great it is to be able to invite an entire department to a project at the click of a button. That’s because this feature makes it really easy to collaborate with other departments. We thought of a cool way to enhance this feature. Before this update, when inviting a group to a project (e.g. marketing), it was impossible to see who exactly was part of the group, because instead of seeing the members’ email addresses, you’d just see the number of active members (e.g. 12 active members). But, now we’ve added in the ability to see who exactly you’re adding to your project when adding a group — you’ll still see the number of active members — only now you can click on it and see a popup detailing every member in that group.

Remember when adding a group to a project — the entire group has the same project rights. If you’d like individual members to have different access rights — you’d still need to invite them individually. This feature is available on the MeisterTask Business and Enterprise plans. If you’d like to find out more or get a free trial, contact our sales team.
Don’t have a MeisterTask Pro Plan yet? You can upgrade now, or if you don’t have a MeisterTask account at all, you can get started with our free version.
Integration Updates
GitHub
Great news for all our developers and testers using GitHub out there! Along with a few bug fixes, we’ve added new functionalities to this integration update.If a PR (pull request) references a task (which you can now link using the task’s ID), a link will automatically be added to the related MeisterTask task. Also, we’ve added a new admin view that lists all linked GitHub accounts. This update only affects users who use this integration.
Zendesk
If you’ve got your MeisterTask account linked to your Zendesk account, we haven’t forgotten about you! Along with a few bug fixes we’ve also given this integration a HUGE overhaul and added in a few highly requested features. This big update lets you:
- Create MeisterTask tasks more easily directly from Zendesk. You no longer have to go into MeisterTask first and create a link to a specific project. Now you can just choose the project and section that that task should be created in directly in Zendesk. Bonus: Each task created in Zendesk will include the ticket ID as well as the user’s email address.
- Attach documents from Zendesk tickets to MeisterTask tasks (of course, this is only available if the actual ticket has attachments).
- View tasks in Zendesk so you know immediately which tickets already have corresponding tasks in MeisterTask. You’ll also be able to see when the task was created, who the task is assigned to, the comments associated with the task, when the task was last updated as well as the status of the task (Complete. Yay!)
- Seamlessly switch between Zendesk and MeisterTask — as mentioned above, all MeisterTask tasks created in Zendesk are accessible via the Zendesk app panel. And, similar to a related task, all MeisterTask tasks associated with a Zendesk ticket can be accessed in the right panel of the task dialog under “integrations”.
This update also only affects users who make use of this integration. For more detailed information on how it works and how to set it up, check out this Zendesk integration help center article.

That’s all for now, folks!
That sums up our latest features updates! Have you tried any of them out? If so, we’d love to know what you think! Give us your feedback, especially if it’s really good — @meistertask on Twitter and give us a shout-out!
